
Our Facebook Page to Follow: Aquarium/Pond Answers Facebook
This is a unique resource for answers, help, & advice to aquarium and pond questions not found elsewhere; With regular posts & article updates.
In our research; we use aquaculture, horticulture, medical, & university research to compile many of our articles.Our Recommended Lighting for highest efficiency professional planted/reef aquariums: "AquaRay Lighting"
Aquarium, Fish Parasites, Worms; Planaria, Nematodes, Detritus, Anchor
By Carl Strohmeyer-PAMR 40+ years experience
Updated 6/19/23
In Aquariums & Ponds
The Index below index breaks down the Worms into their three Phylums:
*Platyhelminthes, *Nematoda, & *Annelida
As well as information about Feeding Worms & Anchor Worms, which are not worms, rather copepod crustaceans.
- Platyhelminthes (Trematodes, Flukes, Fish Lice, Flat worms, Planaria)
- Nematodes (Round Worms); Including Camallanus, Capillari
- Treatment of Internal Nematodes (& some Internal Trematodes)
- Suggested Treatments/Preventatives for Both Internal/External
- Annelids (Segmented Worms), Detritus Worms
- Anchor Worms
- Hydra
- Feeding Worms including:
Basics, Identification, and TREATMENT in Aquarium and Pond Fish.
Readers should note that ALL these parasites are INTRODUCED, whether by a fish directly or by an intermediate host such as a snail.
If you have had a certain fish for over a year, with no additions or possible intermediate hosts in the last six months, chances are you do not have one of these worms infestations listed. So always look for identifiable evidence of actual worms, and lacking these, utilize all circumstantial evidence to confirm otherwise, including the chances of introduction.
Otherwise, follow any circumstantial evidence that may be pointing to other copycat symptoms which may include internal Aeromonas infections, Ichthyophonus, osmoregulation issues, simple aging/genetics/earlier life trauma that injured internal organs, or quite often poor diet which can cause eventual liver & kidney damage as well as making a fish more susceptible to intestinal Aeromonas infections (which can present in feces like parasitic infections).
The bottom line without introduction in the last few months; what many might think is an internal parasite problem is very likely not and is a much more common Aeromonas bacterial infection (which is all around from the soil to your substrate and does not need introduction into the aquarium) or also quite possible, with the plethora of well marketed fish foods with poor energy levels and poor fiber contents, a nutritional issue.
Suggested Diet for CORRECT energy and fiber levels/content:
Clay Neighbor's AAP Custom Fish Food
Information is included about non parasite Detritus Worms (commonly seen when an aquarium is cleaned or in aquariums with high bio loads and is an area with much confusion especially on the internet and often mis-identified as PLANARIA (Freshwater). More about Detritus Worms further into the article.
Information about: The Truth about Planaria in Aquariums
For information about "Whirling Disease" caused by the myxozoan parasite "Myxobolus cerebralis", please refer to this related article from "Aquarium/Pond Answers:
Whirling Disease (Myxobolus cerebralis) in Fish
Before any aquarium/pond fish treatment it is important to know all the steps as often treatment is much more than dumping medication into an aquarium.
Please read this article before ANY aquarium treatment regimen:
Fish Diseases | How to Treat Sick Fish
PLATYHELMINTHES:
(Monogenea, Trematodes/Flukes, Planarians)

Platyhelminthes consists of the unsegmented flatworms, which include both free-living and parasitic species.
These worms have bilateral symmetry, and can move by using layers of muscle or by gliding along a slime trail using cilia.
Flatworms lack a circulatory system and complete digestive system, instead flatworms absorb nutrients through their skin and excrete wastes using specialized "flame cells".
*Flame cells function like a kidney, removing waste materials.
A few flatworms have primitive light-sensing "eyes" that allow them to move either towards or away from light, while other species have different types of sensors on their bodies, including chemical, balance, and water movement receptors. Most species of flatworms reproduce both sexually and asexually.
The trematodes belong to the Animal Kingdom Phylum Platyhelminthes, and are commonly referred to as flukes.
Trematodes usually have flattened bodies, a primitive digestive system, suckers for attachment to their hosts, and are hermaphrodites (an organism that possesses both male and female sex organs).
The Monogenea are the class ectoparasites that infect fish.
Planaria are both marine and freshwater and can be parasitic, but this is generally rare and the few that are, generally are parasitic toward corals, eggs or other stationary "victims".
See the section on Detritus Worms for more about Planaria since these are all too often confused with Detritus worms even though a completely different Phylum of worms.
INTERNAL TREMATODES:
Internal Flukes generally use intermediate hosts such as snails or other mollusks. The eggs must get into water in order to hatch and be able to infect their first host, a freshwater snail. The fluke develops in the snail and then burrows out to seek the second host which is a freshwater fish. Many species of snail and fish may carry these internal flukes.

- Here is a dissected fish displaying a serious internal Trematodes infection.

GILL FLUKES:
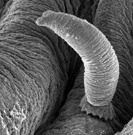
Gill flukes (Dactylogyrus) will appear on the gill filaments as tiny dark spots 0.04-0.08 inches (1-2mm) long.
Gill flukes can infect freshwater and saltwater fish and are found on fish from the wild as well as farmed fish.
These parasites attach to the gills of the fish and feed on mucus, epithelial cells (cells that line the inside of gills and perform the tasks of secretion, absorption, protection, and transcellular transport), and blood from the host.
The pictures above display first a standard microscopic slide of an isolated gill fluke and then to the right a Scanning Electron Microscope view of a gill fluke attached to gill filaments.
It is noteworthy that 100% positive identification with the naked eye is impossible.
Other than scraping the gills (which can be fatal to the fish) and then preparing a slide, your best recourse is an "educated guess" based on redness in the gills (which can be other issues too such as ammonia poisoning burns), and scraping (flashing) of the fish against objects in the aquarium or pond in the area of the gills.
In fact in the absence of this "flashing", odds are the redness is bacterial (often Columnaris) or inflammation from ammonia poisoning (past or more likely present)
More about Gill Flukes;
Much of the mucus being produced by the fish is in response to the physical injury caused by the parasites.
Damage is physical and inflammatory, with secondary bacterial infections such as septicemia. Small or weak fish may die from the stress of acute infestations.
Gill flukes reproduce via eggs that drop away to hatch in about 2 to 4 days depending upon temperature.
The hatchling Dactylogyrus is ciliated similar to a paramecium. Once a host is found the water-borne Dactylogyrus larvae has eye spots that enable it to swim away from light and burrow into the fishes' gill cover as the fish respires.
From my experience in a healthy aquarium or pond, even if one or two fish in the aquarium/pond have a large enough parasite infection to be irritated, if the larva fails to find a host, it dies.
However in poorly filtered and/or crowded ponds or in particular aquariums, these conditions increase the likelihood the larva will find a host. Once attached, it may take a week to mature and start producing eggs.
The adult Gill Fluke is assumed to only live 5-10 days.
Improving filtration and over crowding is as important as treatment.
With larger ponds, generally isolating the fish in a tub or small "play pool" is all that is necessary for treatment, assuming crowding and filtration is not a problem or improved.
Common aquarium carriers of gill flukes include: Plecostomus, Otocinclus, Corydoras, Koi, Discus, Characins, livebearers (Poeciliidae), some tetras (Characins) and Barbs (Cyprinidae), and Elephant Nose (Gnathonemus petersi).
For more about Monogeneans Flukes, which are a group of parasites best described as flatworms but are now considered a different class from Trematodes, please see these articles:
*Monogenean Parasites, Marine Fish
*Monogenean Parasites in Fish
FISH LICE (Argulus):
These are often round, flat and green.
They are similar in treatment to flukes and anchor worms. These can be physically removed with tweezers, and then the wound treated with Mebromin, hydrogen peroxide or even Neosporin followed by a 30 minute Methylene Blue Bath.
Reference: Fish Baths; Basic Ingredients, Methylene Blue
 MARINE FLATWORMS:
The Acoel flatworms commonly observed are “Redbugs” or “Red Planaria”, of which the genus Convolutriloba is a member as in the picture to the left of Convolutriloba retrogemma.
While Convolutriloba retrogemma are often blamed for coral attacks, in reality this is rare. Rather, they breed rapidly and reproduce either sexually, laying eggs or by the asexual processes of fission/ budding where the worm simply splits up, producing a bud that forms a new worm.
Therein lies the problem: the flatworms crawl along the coral in search of food and, as they rapidly multiply, they block the coral's light as well as hamper nematocyst capture of the coral’s prey. The coral is thus deprived of symbiotic nutrient nourishment, as well as planktonic food, and slowly starves to death.
The use of "Reef Dip" or a freshwater dip of corals or similar is the best prevention for these flatworms.
Where to purchase: *SeaChem Reef Dip
Treatments for External Flukes or Worms (including Flatworms/Planaria):
- Clout/Dylox
Clout, Dylox (AAP Dyacide) and other "in tank" treatments are often more effective when accompanied by baths or dips, as well, if a parasite such as a camalanus worm is exposed, treatment is often more effective.
Where to purchase:
AAP Dyacide (Dylox)
For marine applications, I generally will treat twice with a water change and carbon treatment in between.
ALL invertebrates should be removed during treatment (Corals, Shrimp, Anemones, etc.).
Prior to re-introduction to the treated aquarium, all corals should be dipped in pH stabilized freshwater for 25 to 45 seconds.
A standard dose of Potassium Permanganate or AAP Dyacide or Clout can be added to this dip for extra measure.
This can also be used for nematodes, camalanus worms, or internal protozoans; although sometimes multiple dosages may be required. - PraziPro
This can be used as either a bath (as well as mixed with Methylene Blue) or 'in-tank. treatment.
This is highly effective when used as directed for external parasites
Mild effectiveness for internal parasites
*Methylene Blue from AAP
- Trichlorfon
- AAP Potassium Permanganate
ADVERTISEMENT
NEMATODES:
(Round Worms)
 Nematodes, also known as Roundworms, are a very common phyla of animals of which there are many parasitic forms. Nematodes are one of the simplest animal groups to have a complete digestive system, with a separate orifice for food intake and waste excretion unlike the Trematodes mentioned above. Reproduction is usually sexual and males are usually smaller than females.
Parasitic Nematodes can have quite complicated life cycles, moving between several different hosts or even locations in the host's body.
If the Nematode has a direct life cycle, then it does not need an intermediate host and infection can spread directly from one fish to another by means of a fish ingesting of eggs or larvae.
If the Nematode has an indirect life cycle the nematode eggs or larvae enter an invertebrate intermediate host (such as copepod, tubiflex worm, or insect larva) or a fish intermediate host (these fish are then consumed by larger carnivorous fish) prior to being eaten by or entering the final host fish.
 Indications (Diagnosis) of Nematode Infestation:
A method of diagnosing a nematode problem is generally just a guess. This is particularly plausible when a fish is eating regularly yet continues to lose weight, metabolizing body musculature to stay alive.
This is usually seen as thinning along the back on either side of the dorsal fin. This often results in a well-fed fish starving to death.
White feces can also be an identification tool, however this can be misleading as to a true Nematode (worm) infestation, as long thin white feces along with bloating are just as often an indicator of a bacterial infection; generally Aeromonas or possibly a digestive issue.
This can also be an indicator of a combination bacterial (again Aeromonas) and protozoan Flagellate infection, usually Hexamita.
Loss of appetite along with the other mentioned symptoms (such as thick white feces, along with some bloating on one side or both of the fish) can also be an indicator of a Nematode infection, especially a Eustrongylid nematode infestation.
Much More Information:
Gram negative, Aeromonas Infections in Fish
Generally a more positive identification of internal Nematodes is a thread like worm protruding from the anus.
True identification begins with a microscope (& often requires a necropsy of the fish after death).
Nematodes are smooth, cylindrical, relatively long worms, which distinguishes them from the flatter, segmented tapeworms and from the wider and shorter Monogenea Flukes.
Here is a list of some other general symptoms of nematode infections (besides the above already mentioned symptoms):
- Body Hemorrhaging
- Lumps or nodules on outer body (epidermis)
- Bloated or the opposite, wasting of the abdomen (the fish may continue to eat or show otherwise normal behavior).
It is noteworthy that bloating in particular is generally a better indicator of a gut infection such as caused by Aeromonas Bacteria and/or a poorly functioning digestive system (which could also be the result of poor fish osmoregulation) - Cysts, Inflammation, or Granulomas
A Few Common Nematodes:
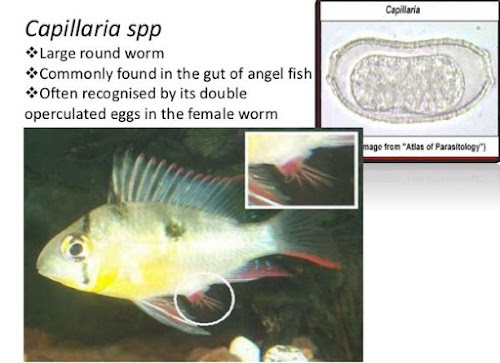
Capillaria/Capillari.
These are probably the most common nematode due to the relatively non-complex life cycle and ease of transmission, as Capillaria spread from one fish to another by ingestion of infective larvae that live in the intestines of cichlids such as angelfish, discus, gouramis, tetras, cyprinids (and some other fish as well).This is often referred to as "Gourami Disease" due to the frequency of infection in Gouramis
Symptoms common to this particular nematode include a bulge in the lower abdomen near the vent, or Capillari worms protruding from the anus.

Eustrongylid nematodes.
These are found in muscle within the body cavity or encapsulated on the liver and other organs. These nematodes can affect a number of different species such as guppies, gar, danios, angelfish and other cichlids.Affected fish typically have bloated abdomens (similar to dropsy of bacterial origin), as these nematodes often migrate into the body cavity and can be quite large.
Unfortunately the treatment of these Nematodes usually fails due to the location of the larvae within the coelomic cavity or in the muscle of the fish, which is often misdiagnosed as bacterial Dropsy leading to the somewhat misleading statements that “Dropsy is un-treatable” when in fact the problem was NEVER Dropsy!
Reference: Dropsy in Fish

Camallanus Nematodes.
These infect the gastrointestinal tract of live-bearers, cichlids and other species of freshwater fish.Symptoms (but not necessarily proof of infection):
- Usually, the first CLEAR indication of infection is a red worm extending from the anus of a fish (sometimes mistaken for feces).
- Scoliosis; Lateral curvature of the spine
- The lower part of the fish' body is hollow and wasted
- Parasite infested fish show very slow or no growth, as parasite is taking the food.
- Fish is fading away, looks as if it is starving to death.
The life cycle of Camallanus worms passes through three phases;
- A free-living stage
- A series of molts during which time the worms infect an intermediate host (crustaceans such as Cyclops and Gammarus)
- Then another molt that takes place in the final host/fish.
If the intermediate host crustacean is eaten by a fish, then the third-stage larvae becomes active and will start feeding again.
After two more molts, it will become a sexually mature male or female adult worms.
These are the distinctive red worms aquarists see protruding from the vents of infected aquarium fish.
One exception is the Camallanus cotti which has the ability to skip this stage, if a suitable crustacean host is not available. However there still needs to be a pathway to infection, which still often can rule out reinfection. Consumption of an infected fish by a tank mate or ingestion of feces produced by infected fish are possible modes of continuing the life cycle and thus reinfection. Removal of dead fish and other methods of consumption along with isolation and quick clean up of any and all feces should break this life cycle from my experience.
TREATMENTS for Internal Trematodes and Nematodes:
Before you treat, I suggest reading this article also from the "Aquarium/Pond Answers library:
Fish Diseases | How to Treat Sick Fish
The above article is very helpful in that often even milder mediations are much more effective when ALL PARAMETERS are spot on.
In particular, I have seen the relatively mild Metronidazole/Praziquantel combination work well for Camallanus worms when parameter are spot on (this includes a balanced Redox by keeping oxidative stress as low as possible) and not work at all when these are not.
This why we need to be careful with anecdotal advice when it comes to statements that "Metronidazole/Praziquantel will not work", as when we dig deeper as per my long time experience with fish treatments, we will often find that there is a reason the treatment failed, and it was not the medication.
- Metronidazole is a mild treatment parasitic worm treatment that is most effective for single cell parasites such as flagellates (examples include Giardia), but it can be even more effective when combined with SeaChem ParaGuard in tank and/or then used as a medicated food soak combined with Praziquantel (do not use ParaGaurd as part of the fish food soak).
The use of Metronidazole has the added benefit in that it is effective for anaerobic internal infections, common to the gut.
Reference:
*Aquarium Medications; Food Delivery of Medications
*What Are the Treatments for Intestinal Parasites in Humans (while not aimed at fish treatment, much more research goes into human worm treatment, so still worth a read)
Recommended Product Sources that support this FREE Information and the Aquarium/Pond Keeping Hobby::
*AAP Metronidazole
*AAP ParaGuard - Praziquantel; this product works in part by paralyzing the parasites, thus allowing the host to more easily shed the parasite both internally and externally.
Generally only one treatment is needed (if fed, two to three times in one day), although re-treatment 5-7 days days later of a product containing Praziquantel is required.
Praziquantel along with Metronidazole are a couple of the safer medications you can use for your fish to treat parasites, both internal & external (& more effective when combined).
- AAP General Cure
General Cure (which contains Praziquantel, Metronidazole) can be used as a medicated fish food soak for internal parasites.
Jungle/Tetra Parasite Guard is similar (it contains Praziquantel, Metronidazole, Acriflavin, Diflubenzuron).
Of the two, General Cure is the better choice since Acriflavin & Diflubenzuron are intended only for external parasites (of which this is the better product for external parasites/worms).
General Cure can be used as a medicated fish food soak by using 1/2 a packet for an average 60 gallon bio load medicated fish preparation. Fish food should be soaked for 15 minutes. After soak, pour entire contents into aquarium
Recommended Product Source that support this FREE Information and the Aquarium/Pond Keeping Hobby:
*AAP General Cure - Levamisol Once one of the more popular treatments for nematodes, but increasingly harder to find due to many safety concerns which includes the fact it is much more dangerous than others listed here when over dosed or even used normally as it can cause serious liver and blood issues. Even in doses needed to treat internal worms, "Neutropenia" may result which then results in the fish being more susceptible to bacterial infections.
Levamisol is best used as part of a blend, such as in AAP Discomed where overdosing is nearly impossible since it is part of synergistic blend, otherwise use it as a treatment as a last resort due to the problems it can cause with the fish immune system, especially if over dosed accidentally.
AAP Discomed contains Levamisol, Neomycin, Magnesium Sulfate, NaCl, & Piperazine
Recommended Resource: AAP Discomed (Fish Food Soak) This is the strongest yet safest internal parasite fish food soak medication available anywhere! This is a product NO SERIOUS AQUARIUM KEEPER SHOULD BE WITHOUT IN THEIR ARSENAL!
See this article for use and cautions:
Aquatic Medications #3; chemical and parasite treatments
Treat with Levimisol once followed by a water change and treatment in 3-7 days. Treat a third time after 1-2 weeks following the second treatment.
Be careful, as Levamisol can kill many worms quickly, which with most internal nemtode infections is not an issue since they are not generally widespread. HOWEVER with use for widespread worm infestations, this can be a problem which is why this should NEVER be used to kill Detritus Worms (often misidentified as Planaria)
Here is a source for Levamisol:
https://www.inkmkr.com/Fish/ItemsForSale.html  Piperazine An especially good choice for Capillari and a safer choice than Levimisol or Fenbendazole if you can find it. It is also more effective than Praziquantel.
The reason Piperazine is safer is that it works via anthelmintic action (used to expel or destroy parasitic worms in the gastro-intestinal tract).
The mode of action is generally by paralysing parasites, which allows the host body to easily remove or expel the invading organism.
For this reason, Piperazine is gentler on the fish and aquatic environment.
Reference: Aquarium Medications Part 3; Piperazine
Recommended Resource for Fresh Piperazine:
*AAP Piperazine/Pipzine
*AAP Discomed (Fish Food Soak)- Fenbendazole; Commonly sold as a dog de-wormer and has a wide range of internal worms it will kill. It works by interrupting the parasites’ cellular transport and metabolism.
Fenbendazole can be mixed with fish foods, but often flavor enhancers such as AAP Garlic Guard are needed to hide this medication so that fish will accept the food "spiked" with Fenbendazole.
Do not combine with Praziquantel
Do not use if your fish has any bleeding issues, as Fenbendazole can inhibit red blood cell production - Combinations such as the above mentioned AAP General Cure that have Metronidazole as an ingredient as this medication is often effective for secondary bacterial infections such as Aeromonas and even better for possible Hexamita infestations of the gut, as witnessed in a white feces diagnosis where the aquarist is unsure of whether this is a worm or Aeromonas/Hexamita infection.
Adding Neomycin to the Fish Food soak may help with secondary infections and/or gut infections while adding Nitrofurazon or even stronger AAP Spectrogram to external "in-tank" or hospital/bath treatments can help with secondary infections, especially Aeromonas infections.
Recommended Product Sources:
*AAP Discomed (contains Levamisol, Neomycin, Magnesium Sulfate, NaCl, & Piperazine)
*AAP Yellow Powder- Premium Nitrofurazone
*AAP Spectrogram; Kanamycin/Nitrofurazone Wide Spectrum Combination
*AAP Neomycin - Epsom Salts; While not a treatment, the use of pure Epsom Salts (do not use scented products such as Lavender Epsom Salt) can help with passage of the parasite when used in a bath and or a fish food soak.
For a fish food soak (along with medications such as General Cure), I suggest 1/8- 1/4 tsp of epsom salt along for every ounce of food prepared.
The addition of AAP/SeaChem Garlic Guard to this fish food preparation can further help with palatability.
Recommended Product Source:
*AAP/SeaChem Garlic Guard
For BOTH Internal and External Nematode/Trematode Treatment
- Medicated 30 minute baths using Methylene Blue, Aquarium Salts, as well as the antibiotics such as Metronidazole or Nitrofurazone at double normal recommended tank strength; This will aid in absorption of medications and osmoregulation that is VERY important, especially with internal parasite infestations which are difficult to treat even with strong medications.
The Methylene Blue will be absorbed and aid in oxygen delivery although it is only mildly effective against the parasites, Methylene Blue aids in the fish’ general health. - A good follow up treatment as well as preventative which also improves fish immune resistance via improved Redox Balance (lowering oxidative stress) would be an AAP Medicated Wonder Shell.
The AAP Medicated Wonder Shell is also a good part of a everything but the kitchen sink type treatment when it is not clear whether the problem is nematodes or an internal gut infections
If a medicated fish food soak is being used, the Medicated Wonder Shell would also be useful as an in-tank treatment to fight infection and improve fish immunity.
Product Resource:
AAP Medicated Wonder Shells - Berberine (Oregon Grape Root Powder): While a new use in the aquarium hobby, growing evidence for the use of Berberine best found in Oregon Grape Root is growing in human studies. Since more funding is available for human studies, this often makes these studies more valuable and accurate.
"Berberine has demonstrated significant antimicrobial activity against a variety of organisms including bacteria, viruses, fungi, protozoans, helminths, and chlamydia. Currently, the predominant clinical uses of berberine include bacterial diarrhea, intestinal parasite infections, and ocular trachoma infections."
Reference: Berberine; US Library of Medicine
Another benefit of the use of Oregon Grape Root as a source of Berberine is this herbal treatment can work with many other standard treatments such as Metronidazole to improve effectiveness.
Current suggested use is 400 mg of power per 10 gallons of water and used as a additional treatment in aquariums and fish baths, not the sole treatment.
Further Reference: Aquarium Medications Part 4; Oregon Grape Root
Recommended Product Sources that support this FREE Information and the Aquarium/Pond Keeping Hobby::
*AAP Yellow Powder- Premium Nitrofurazone
*Methylene Blue from AAP
*AAP Medicated Wonder Shells
How to perform a Medicated Fish Bath:
*Medicated Fish Baths; Dips, Swabs
Salt is advised not only in the baths at 1-2 teaspoons per gallon, but also in the display or quarantine tank at 1 teaspoon per gallon to 1 tablespoon per 5 gallons as this will also aid in mucous generation and the movement of fluids inside the body cavity (osmoregulation).
Correct Calcium Levels are also important for osmoregulation that will aid the fish in “battling” a parasite infestation (especially internal).
Also see these article for more about medicated baths & fish quarantine:
“Aquarium Disease Prevention; Quarantine, Baths”
Prevention is the BEST treatment for Nematodes, Marine Flatworms, and Flukes, especially Internal Nematodes
This is accomplished by regular water changes, the purchase of fish from a known quality resource, removal of the final host (in the case of Eustrongylid nematodes; birds and pond sanitation), or any intermediate hosts (tubiflex worms or other oligochaetes).
It is noteworthy that many (if not most) fish farms are located OUTDOORS, so the spread of nematodes via intermediate and finals hosts is easier than one may think. Knowing your source for your pet fish is very helpful as often many internal nematodes will not show symptoms in fish for over 30 days after arrival in your aquarium.
A final note as to treatment of nematodes in particular is that nematode infestations are generally internal, making treatment and medication “delivery” very difficult. More so with Eustrongylid nematodes since they are found in difficult to deliver mediation internal body locations.
My point here is, hopefully one can start treatment early or prevent an infestation altogether, however from my experience this is not a “real world” expectation as I have often failed to detect and treat with success (assuming it was treatable in the first place), so one should not be too hard on failures in treating internal Nematodes, as I have had my share of both successes and failures even under the good care.
Annelids “Segmented Worms” - Including:
DETRITUS WORMS
The annelids are the phylum of segmented worms which include earthworms. Most annelids are NOT purely aquatic in fresh water; the annelids found in freshwater are all oligochaetes (which means "few-bristled") and are not very important in the freshwater ecology as are their marine cousins, the polychaetes (which means "multi-bristled").
All the oligochaete worms are hermaphrodites (an organism that posses both male and female genitalia) and many are nearly microscopic.
 Detritus Worms (from the group of worms called Oligochaetes, sub group naidid worms) are often misidentified in the aquarium hobby as Planaria without close inspection by many internet articles such as about.com.
Many of these worms are accidentally introduced by live plants, gravel (especially in the case of common Detritus Worms) live fish foods, and even brought in with fish transfers.
(Click picture to enlarge)
Many not familiar with Detritus worms will label these as everything from midge larvae, Planaria, to baby earthworms, of which none is true. They are very common and most often seen during vacuuming and other cleaning procedures.
These worms generally are not a problem and often go un-noticed living in the gravel aiding in breakdown of wastes, however high numbers of particular species can indicate low oxygen levels, cloudy water, poor Redox and low filter productivity.
This very often suggests some degree of pollution caused by poor cleaning procedures, over crowding, over feeding and poor filtration.
When the population explodes these worms often leave the gravel and cling to the sides, usually close to the surface as oxygen depletion due to the cumulative affects of increased organic mulm (often resulting with pH/KH drops, higher nitrates, poor Redox Balance), cloudy water and simply too many Detritus worms. This then drives them from the oxygen poor gravel where they normally hide/exist.
It is when these worms are crawling up the sides that most aquarium keepers take note, often not realizing that these worms have been present for some time living quietly in the aquarium substrate before a population explosion and often subsequent oxygen depletion drives them into the open.
Do NOT make the mistake of treating with Levamisol to rid your tank of Detritus Worms (aka false Planaria) as so many forums and websites advice.
I know for a fact that the die off can kill off many fish and that simply taking care of the cause of the worm population "explosion" will remedy this issue!!!
Please reference these sources for even more identification (and further information so as to dispel the internet aquarium myth that these are Planaria):
Detritus Worms/Planaria in Aquariums
The above article is THE article to read on the subject!
Other Reference:
*Aquatic Worms

As stated earlier, control of these detritus (composting) worms is brought about by good vacuuming procedures, proper feeding, good filtration, lowering bio load, and addition of fish that will eat these.

This is a Planaria (a flat worm, not an Annelid)!
(click to enlarge)
ANCHOR WORMS:
 Anchor Worms as seen to the left are a genus of copepod crustaceans (Species Lernea) that are parasitic to freshwater fish, especially coldwater fish often raised in ponds such as Goldfish.
I also have personally caught Trout that have been covered in Anchor Worms, but it is noteworthy that these trout were in a small, man made lake that by late spring is too warm for Trout to live in.
The point about the trout is applicable to the many anchor worm infestations I have dealt with in goldfish, in that it was much more common in warm or warming months where water temperatures are higher than is best for goldfish, @ 80F or higher.
The Anchor Worm is not always noticeable as pictured here, often it starts out as a small red sore. These red sores then multiply followed by small thread like protrusions that are the anchor worm.
Other common symptoms include frequent rubbing/flashing, inflammation on the body of the fish, and generally lethargy of the fish such as sitting on the bottom or floating on the surface of the water.
TREATMENT:
Best treatment is to use tweezers to remove the worm from the fish.
The fish should be gently cradled in the palm of your hand so as to not injure the fish as a net can. After removal, the wound SHOULD/MUST BE treated/swabbed with Merbromin/AAP Wound Control (Best to prevent an infection), Methylene Blue (2nd choice), or Hydrogen Peroxide (3rd choice).
If the Anchor Worm cannot be removed (or you are uncomfortable doing so), this is especially true with very small anchor worms, a direct swab of 50% water Potassium Permanganate & water directly on the worm should be performed followed by a rinse then a swab with Merbromin (AAP Wound Control).
With either procedure, a bath should also follow that consists of AAP Nitrofuracin Green, OR Methylene Blue, Salt, Nitrofurazone, & possibly Metronidazole.
Recommended Product Sources that support this FREE Information and the Aquarium/Pond Keeping Hobby::
*AAP Wound Control (Merbromin)
*AAP Nitrofuracin Green- Full Spectrum Treatment
*AAP Yellow Powder- Premium Nitrofurazone
*AAP MethyBlu PREMIUM Methylene Blue (Best version)
*Kordon Methylene Blue from AAP
*AAP Potassium Permanganate (Clear Water)
For serious infections and to prevent reinfestation, an in tank treatment with AAP Dyacide or Clout (Dimilin is similar), OR Pimpzine OR a Super Ich Plus (or ParaGuard, but not as strong)/Furan 2 combination can be used, OR General Clear, OR PraziPro (this is in order of strength).
AAP Dyacide or Clout (Clout is no longer available) are about the only treatments that will kill the Anchor worms while still actually on the fish, otherwise most medications kill Anchor Worms in the free swimming stage.
If a secondary infection is also present (which is common), such as red sores, a combination of AAP ParaGuard and Triple Sulfa OR AAP Furan 2 is often the best choice (beside the before mentioned physical removal and baths)
As part of the lifecycle, the female anchor worm will release her eggs into the water when they are about to hatch into free swimming larvae. These larvae will swim about for up to a week looking for a fish to attach itself to. If they don’t attach themselves in this period of time they will die off. So interrupting this is generally essential for a full "cure".
This means healthy aquarium conditions, including optimizing ALL water parameters along with water changes.
A medicated fish food using your current fish food soaked with AAP Discomed may help further along with AAP Pipzine, Prazipro or General Cure in the aquarium (Pipzine being the first choice).
More about optimum aquarium care: AQUARIUM DISEASE PREVENTION; Steps to a Healthy Aquarium & Sick Fish
Reference: Aquarium Medications Part 4; Microbe-Lift Herbtana & Artemiss
As well, beware of discounters such as Amazon selling products containing diflubenzuron (Dimilin).
With diflubenzuron, fish have been shown to accumulate diflubenzuron at a rate 76 and 99 times greater than the water content in the gills and liver which can affect long term fish health.
Recommended Product Sources that support this FREE Information and the Aquarium/Pond Keeping Hobby:
*AAP Dyacide (Dylox)
*AAP Pipzine
*AAP Discomed
*AAP Super Ich Plus
*AAP ParaGuard
*AAP Yellow Powder- Premium Nitrofurazone
A follow up in tank treatment with a Medicated Wonder Shell can be helpful too, regardless whether a previously mentioned strong in tank treatment was used or not.
Where to purchase: *Medicated Wonder Shells
HYDRA:
 These small invertebrates are closely related to jellyfish and coral, which prey on small fish, shrimp, etc. While Hydra appear quite small and undefined in shape, they are simply small adult predatory animals.
Hydra have a tubular-like physique and measure just about a few millimeters. They possess one sticky foot on one side of the lower part their body, with several tentacles forming the other end of their body.
These tentacles have stinging cells which are capable of immobilizing their prey.
Hydra can take out prey close to their own size and their quick reproduction allows for the quick spread of Hydra. Generally Hydra are accidentally introduced into an aquarium by many different means, often without the the unsuspecting aquarium keeping even knowing.
Plants or other bio introductions from a pond sources are common sources of introduction.
TREATMENT FOR HYDRA:
Many have successfully used fish such as blue or gold gouramis as well as paradise fish and sometimes mollies too to eat hydra (although this often does not completely rid your aquarium of these pests).
Generally chemical treatment is the best method of treatment, but can treatments that are effective generally will kill shrimp, snails, and similar invertebrates.
Be careful of using Dog wormers as is often suggested, as while these can be quite effective, these also can remain toxic to your aquarium environment.
Better is something intended for the aquarium environment that degrades quickly such as Clout or AAP Dyacide (unfortunately Clout has been discontinued).
Thorough water changes after use is also a must to keep down a possible spike in the nitrogen cycle.
Resource: *AAP Dyacide (Dylox)
WORMS USED AS FISH FOOD
Annelids:
Whiteworms (Enchytraeus albidus):
 These are worms commonly used in feeding for larger fish; for instance, Gouramis and Cory cats love Whiteworms. Microworms (which are Nematodes not Annelids as are Whiteworms) are used for fry.
What we typically refer to as a "white worm" in the aquarium hobby is a segmented round worms (Annelids) that are closely related to the earthworm from the family enchytraeids. Whiteworms are an excellent food source for many amphibians and other aquatic creatures.
These worms can reach over 1 cm or more long. They are NOT a parasite danger to fish or other inhabitants of aquariums and are often seen wiggling up the sides or even at the surface. Whiteworms are basically a worm of de-composition and can multiply rapidly when over feeding is a problem. At this point the biggest danger is oxygen depletion from over population of these worms and a good vacuuming is in order. Many a customer has called or written me about these worms worrying that they have a parasite problem when in reality these worms are good for composting and are at worst an indicator of too much decomposing food and other organic debris.
Grindal worms
Nematodes
MicroWorms:
All the worms that fall under the popular term of Microworms are Nematodes (roundworms) and include Vinegar Eels, and Walter Worms.
Microworms (Panagrellus Redivivus) are non parasitic and small (0.5 - 1.5 mm.) worms, which make excellent supplementary live food for fry which are either too big for infusoria or have outgrown the infusoria stage.
Walter worms:
Walter Worms are about half the size of the Microworm. These are recommended for feeding the very smallest fry. Walter worms generally live in the water longer than the Microworm.
Vinegar Eels
Vinegar Eels are also a nematode are readily cultured in large numbers, provided certain procedures are followed. These worms (also nematodes) are a little smaller than micro-worms, a great size for most baby fish. The worms must be grown in natural cider vinegar that has not been chemically treated to inhibit the growth of bacteria or yeast upon which the worms feed. Advantages of Vinegar eels is they do not breath oxygen so don't create any problems in the fish tank, live a long time in the aquarium, and swim in the water column and stay towards the surface.
References:
*Camallanus (Camallanus cotti & C.lacustris)
*The Worms
*Whiteworms
*Microworms (Panagrellus redivivus)
*Platyhelminthes
*https://www.inkmkr.com/Fish/CamallanusTreatment/
*University of Florida; Nematode Infections in Fish
Other Recommended Aquarium Information/Videos:
The most effective medication BAR NONE for the treatment of Columnaris in an aquarium when used as part of the four step program of Columnaris treatment.
AAP Yellow Powder- Premium Nitrofurazone

YouTube; How to: 4 Steps Columnaris Treatment Fish Bacterial Infection
This video goes over the basics of the full four step plan of properly treating Columnaris in aquarium fish and is a compliment to a FULL reading of this article.
*The article below is a MUST READ for anyone interested in moving from basic aquarium keeping to more advanced aquarium keeping, including better Redox Balance:

Aquarium or Pond UV Sterilization; Level 1 Sterilizer Use
Also for level 1 capable UV Replacement Bulbs
*Aquarium UV Bulbs; American Aquarium Level 1 UVC
*
Aquarium Lighting; Information about T5, Metal Halide, CFL, SHO, PUR, PAR, more
This is THE article for in-depth, researched, and regularly updated information on the subject of aquarium lighting; a MUST READ!

Aquarium Filtration, Filters; Help
*

Aquarium Fish Nutrition; Important Ingredients in Fish Feeding
 FISH AS PETS
Fish as Pets contains articles and commentary of Interest to the Aquarium Hobby
*
POND CARE INFORMATION
 Reverse Osmosis Aquarium Water Filters; with TDS Meter
ADVERTISEMENT
Labels: Anchor Worms, Annelids, Aquarium Parasites, Detritus, Fish, Fish Parasites, Nematodes, Parasite Worms, Parasites, Planaria, Trematodes, Worms
Aquarium Silicone, Tank Repair, Applications, DIY, How To Use
By Carl Strohmeyer-PAMR 40+ years experience
Updated 7/21/23
What Silicone to use and what not to use, Aquarium Repair (& leak identification), Aquarium construction.
Index;
- Silicone Basics
- Aquarium Applications
- Aquarium Repair
Including;
- For DIY (or NEW) Aquarium Selection (including forward comparing glass to acrylic); Glass Thickness & Type
- Silicone Needed Calculation
- Summary
*Also how to use silicone to repair an aquarium (three different applications)
*DIY Aquarium Glass Thickness recommendations.
*YouTube Video demonstrating application of silicone for aquarium crack and hinge repair
OVERVIEW:
This is a subject I have had a great deal of experience in. Due in part because one of my aquarium maintenance services was aquarium re-building, and I re-built many over my 30 years professionally employed in the aquarium maintenance business.
More importantly, I give credit to Bill of "Prestige Aquariums" (which unfortunately went out of business after his death). Bill took me under his wing in 1979 and provided me with free tutelage in the art of aquarium building and I learned a lot from him as a part time apprentice aquarium builder for a couple years.
Much of my experience as well as newer research is relayed in this article.
SILICONE BASICS:
Silicone rubber is a unique synthetic elastomer made from a cross-linked polymer which is reinforced with silica.
Its characteristics are such that it provides a balance of mechanical and chemical properties useful for bonding glass aquariums (not acrylic).
The basic formula is: Me3SiO(SiMe2O)nSiMe3
100% RTV Silicones (RTV= "Room Temperature Vulcanising") are the silicones commonly used for glass construction and is often sold in Home Improvement and Pet Stores (or Online).
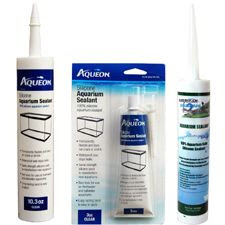
Premium Silicone Resource that supports this FREE information page:
American Aquarium Products (AAP); 100% USDA Approved Silicone
PLEASE NOTE: AAP is the original and official seller of this product. Beware of clearance product sold via Amazon at a lower price, you likely will find a product that does not cure at the proper rate. We purchase directly from the manufacture, and even then the markup is only a $1.50 per container, so if someone is selling for less including shipping, you are indeed purchasing old clearance product, not to mention, harming the professional aquarium industry.
Reference: Buying Aquarium Products via Amazon (& Chewy, eBay)
RTV Silicones consist of polydialkylsiloxane with terminal hydroxyl groups (groups made up of an oxygen atom and a hydrogen atom connected by a covalent bond), which are reacted with organosilicon (chemical compounds containing carbon silicon bonds) cross-linking agents.
This operation is carried out in a moisture-free environment and results in the formation of a tetrafunctional structure (A chemical structure that possesses four highly reactive sites).
100% RTV Silicone Rubber Sealant produces a flexible, durable weather resistant seal between similar and dissimilar materials; 100% RTV Silicone provides excellent adhesion to tile, glass, porcelain, ceramic, fiberglass, non-oily woods, plaster, painted surfaces, and metal.
It will withstand temperature extremes from -60°F. to +450°F. and is waterproof for freshwater or saltwater use.
HOWEVER, beware of silicones that advertise "Weather Proof", as even if these claim to be 100% silicone, these have additives you do not want in your aquarium to better resist UV rays (which is NOT a concern in our aquariums).
Curing takes place when materials are exposed to moisture. Atmospheric moisture is sufficient to trigger the reaction, and thickness should be limited if only one side is exposed to the moisture source. Curing is also relatively slow, reliant on moisture ingress into the polymer which produces Acetic Acid vapors.
However some Silicone formulas will scavenge moisture quicker than other, thus curing in less time.
The result of generic silicones (even if 100%) is a less durable repair/build that does not last as long and does NOT hold up to jostling. Proof of this is during a 1987 earthquake in the LA area, several of the aquariums built with a quicker curing hardware store 100% silicone began leaking (NONE of those built with silicones specifically designed aquarium use had an issue).
Thus using a silicone DESIGNED FOR AQUARIUM USE (which includes being a higher modulus silicone) and working with silicone IN LOWER HUMIDITY is almost always more desirable.
As noted, different formulas and (combined with temperature and outside humidity) will affect cure time.
Dow Corning, AAP, and GE have proprietary formulas (although Dow is often packaged under other brands such as All Glass & Aqueon Aquarium) that cure at an even slower rate as compared to some cheaper formulas often sold in hardware stores that are generally used in construction where this is not an important factor.
This however is important for aquariums to have an even and slow cure time as even some 100% silicones I have used such as such as CRL, would cure too quickly resulting in a less than desirable bond.
Also some NON-100% formulas such as GE Silicon II have a mildew inhibitor (which would be toxic to the fish).
It is noteworthy that plastic (which is made from oil) is not mentioned.
RTV silicone is not useful for bonding acrylic aquariums and the oils within acrylic will eventually cause peeling away (lack of adhesion).
The bottom line is do NOT use silicone for repair of Acrylic/Plexiglass aquariums (or other acrylic applications)!
 For Plexiglass/Acrylic aquariums you would need to use Plexiglass or PVC Cement (Glue) which works by “melting” the Plexiglass panels together.
This is best applied with a needle applicator between the Plexiglass panels along with applying pressure. Silicone is often used after initial Plexiglass construction to provide more water tight seal along the seams of a Plexiglass/Acrylic aquarium, but this will peel after time (it can be re-applied) and provides NO strength for the actual plexiglass panels.
Silicone can also be used to form a seal where water pressure will push the glass panel against a surface that it would otherwise would not adhere well to (although once pressure is removed after initial filling, the silicone will likely not “seat” again in such an application where silicone does not properly bond).
ADVERTISEMENT
AQUARIUM APPLICATIONS:
100% "food grade" RTV Silicones are useful in the construction of glass aquariums and sealing the joints in DIY wooden aquariums. As noted earlier, Silicone is NOT useful for acrylic aquariums as it will peel away over time due to the inherent oils in plastics.
Why is this important?
As I noted in the Basics Section, too fast a cure will not allow proper surface adhesion especially in important seams.
It is also hard to work with in building aquariums and the person needs to work very quickly (usually too quickly) for proper aquarium construction.
Not all silicone formulas are the same, as stated earlier, Dow Corning, AAP, and GE produce a RTV silicone that cures at an even and slow rate necessary for aquariums. It is also noteworthy that most silicones labeled as 100% RTV, are still not food grade.
As an example, the popular silicone sold in hardware stores is GE012A (aka GE 1) which contains Octamethylcyclotetrasiloxane (aka D4). GE 1 or GE012A has D4 at 1-5% by weight.
Ever have one tank that nothing survives in? It probably had that 5% or worse of D4 (Octamethylcyclotetrasiloxane).
AAP/ASI Silicone has D4 @ .2% or less by weight.
Studies on D4 have shown extremely low quantities (we are talking µg / liter) can limit growth, reproduction, and decrease health in fish and it isn't good for us either. It also bioaccumulates. Once these silicones cure the risk is lessened, but D4 DOES still leach into water and even fatty tissues.
These hardware store 100% silicone (as well as most eBay and Amazon silicones if not authorized by AAP) contain D4 that is bad for your fish at low doses, although not immediately fatal at the levels leached into your aquarium. Just like you can drink water with high levels of lead or even arsenic for years and have no trouble, but eventually.
Yes there are many studies that show D4 leaches from silicone. None that we know of that involve aquariums though. Most studies are medical devices, implants, IV tubing, baby bottle nipples, water storage, etc. Guess aquariums aren't that much of a priority for toxicologists? But then you gotta follow the money.
Why gamble with cheap or clearance silicone to save a few dollars when your source should ONLY be AAP authorized aquarium silicone??

Also you want to purchase pure 100% RTV Silicone as many (including silicones produced by Dow Corning) have other ingredients for different applications such as fiberglass.
A good example of a silicone you do NOT want to purchase is Dow Corning Marine Sealant which I have actually seen recommended for aquariums in Yahoo Answers and other Internet sources!
This product is great for fiberglass hulls of boats however it lacks the proper strength for aquariums due to added ingredients that allow for adhesion to plastic.
As well any silicone that advertises that it can be painted on after curing has added ingredients and is not 100% silicone and NOT safe for aquariums or food use. Many silicones sold as hardware stores such as Home Depot have additives that are NOT aquarium safe, so BEWARE if you think about purchasing your silicone from such a retailer!

Finally, many silicones available for sale, especially generic brands often sold at big box home improvement store may be 100% RTV Silicone sealants, but these are not Agricultre Canada, USDA, & FDA approved.
This means these cannot be legally used for sealing any container, equipment, etc used for human food production or storage.
While this may not mean too much to some fish keepers, for me it is important to know that the silicone I am using on my expensive aquatic specimens meet such specifications, since I would not want to place my pet fish in an environment tainted by chemical residuals of a less than pure hardware store brand silicone or silicones often sold via eBay or Amazon (sometimes clearance product of the same manufacturer sold by AAP, but much lower quality due to old manufacture date which is why you should always seek AAP authroized sellers).
YET UNFORTUNATELY many aquarium keepers do just this to save a dollar or two, if that, over the FEW aquarium silicones such as AAP Aquarium Silicone approved for use where food is manufactured!!
This poor logic is baffling to me, as your fish are 100% immersed in the water that is constant contact with the silicone. Even foods processed in containers that have silicone seals only have a short time of exposure, unlike your fish. So to purchase one of these silicones at Home Depot, Lowes, or online on Amazon, eBay (although Authorized AAP Silicone is sold via eBay), etc, is fool hardy.If the USDA, FDA state that short term exposure for foods in contact with these unapproved silicones is not safe, what does this say about long term exposure by your fish??
Here is an inexpensive Food Safe Higher Modulus Silicone Resource that also is a large contributor to FREE aquarium information web sites such as this one:
USDA Aquarium Silicones; AAP
Silicone Life Expectancy;
Most Silicones last as to the stated lifetime from the manufacturer from my experience in keeping literally 1000s of glass aquariums, however being under water, and the acids, etc., do take their toll on the silicone.
However in an aquarium has been used, then left dry, I have found that the silicone will often leak when water is then added again. This is not a problem with a stored new/unused aquarium unless stored in sunlight.
In the case of a stored aquarium with dried or cracking silicone, it is best advised to remove the old silicone and re-apply, do NOT apply new silicone over old silicone.
AQUARIUM REPAIR;
With a good silicone, you can perform a few repairs yourself.
The picture/diagram to the below shows what to basically to look for as to silicone coverage in the important joint where two glass panels meet. This is where most of the strength is obtained from the silicone (please click on the pic to enlarge).
If the silicone is missing or pulled away (as can be easily observed by looking through the glass at each joint to see if air or water is present in place of silicone), you may need to repair this.

The addition of silicone in the inside corners gives added strength and small leak protection, but is not as important for aquarium strength as the silicone in the joint.
If any of the exposed silicone appears/feels dry and easily pulls or flakes away, it should be replaced.
This is also important that braces (if your aquarium has a brace), have this silicone as well.
Small Leak Identification:Often small leaks are the most difficult to find (identify the source of the leak so as to repair).
I have been called out by a client who thought that their tank had a leak on the bottom (which would require a strip down of the tank and stripping of silicone and reapplication), only to find that the aquarium actually was only seeping water from the top (often under the trim) and this small bead of water would run down the side seem in a manner that went unseen.
This type of leak can be found more easily by gently running a paper towel along the sides to look for trace amounts of water which the paper towel would quickly find.
If this is your leak, this could be from the trim (which is often a plastic material and does not adhere to the silicone as well and can often be repaired by simply lowering your water a few inches and stripping the silicone around the trim and then replacing this silicone.
Sometimes simply adding silicone in gaps in the trim or even lowering water level or reducing condensation of water on the glass top which may find its way around top gaps in the aquarium and then to the bottom of the aquarium (often resulting in a wet stand or similar condition)

- Empty aquarium
- Remove ALL old silicone with a razor blade (I prefer a single edge razor blade, see picture to the left).
For removing trim or cutting plastic back strips, I usually use a utility knife, always with a fresh blade (see picture below). - Clean and prepare surface with fine sandpaper (some like to use alcohol, but I have not found this helpful and my mentor at Prestige Aquariums whom I apprenticed under did not use alcohol).
- Make sure all surfaces are dry.
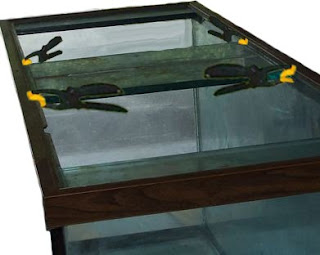
- Apply silicone (a caulking gun works best), making .5 (or smaller) cm. bead in the inside edges.
- Tighten all outside corners with strong reinforced duct tape. For tanks over 75 gallons I recommend wooden clamps.
- Immediately use your index finger to smooth ALL inside edge beads into a smooth surface, quickly wiping away excess silicone.
- Your repair is complete in 48 hours.
Please note that the Vinegar like fumes produced while curing are not generally toxic (I've worked in aquarium factories where the fumes are considerable and have never witnessed any problems), but good ventilation is suggested.

Utility Knife for cutting out silicone under plastic trim, removal of trim and cutting plastic back strips
TIP:
For clean up, both before applying new silicone and more for clean up of silicone that was misapplied but not "set", rubbing alcohol can be used.
Set silicone rubber will not dissolve in alcohol, however remnants left behind from scraping are often more readily removed by rubbing alcohol.
Set silicone will swell to some degree depending on the type of silicone and degree of cross-linking of the polymer. When this happens, the silicone polymer is essentially trying to dissolve, and taking solvent into its structural lattice. But when the alcohol is removed and allowed to evaporate, it will return to the original state, it had not dissolved, or melted.
For non structural corner chips:
- Drain aquarium down to the area of the chip.
- Inspect/ clean/ repair the inside area in needed.
- Clean out broken glass on the outside chip area
- Carefully clean out broken glass (gloves are recommended), a razor blade followed by fine sand paper works best.
- Inject new silicone followed immediately by a piece of glass that fits reasonably well into this chip.
- Add more silicone if necessary.
- Smooth repair and add a piece of wax paper (or similar waxy or mildly oily band aid), followed immediately by strong reinforced duct tape to hold this repair in place.
- This “band aid” can be removed in 24 to 48 hours and the aquarium re filled.
- Remove old hinge
- Place both pieces of glass on a firm level surface
- Run a .5 cm bead of silicone carefully down the area where both pieces of glass come together.
- Immediately, using your index and middle finger, run these fingers over the top of this silicone bead forming sharp peak of silicone between both pieces of glass. Remove excess. Bare hands (index and fore fingers) work best as the oils present repel the silicone from adhering too much to your fingers.
The silicone should look sort of like this after running along it with your index and fore finger pressed together: /\ (YouTube video located below demonstrates this) - After 24 to 48 hours your new and more durable hinge is ready.
For loose or failed (loose) Center Brace:
- Drain water down to whatever level it takes to move the brace back to its original fit (in other words to take out the "bow" in the glass)
- Remove ALL old Silicone
- If your aquarium has a plastic center brace, please note as stated elsewhere in this article that silicone does not adhere to oil based products well and eventually fails, so repair of this is doomed to eventual failure again.
My suggestion is to either cut or have cut (at a local glass shop) a glass center brace to replace the original plastic brace.
OR as noted by a member at Everything Aquatic, the use of an aluminum bar and drilled holes thru the bar and the original brace, then put rivets into the holes drilled. - Place an even bead of quality silicone on just the tank portion of where the brace needs to be placed back into.
- Finally clamp the brace as shown in the picture.
- Clean the area on BOTH side of the crack thoroughly with a razor blade (no solvents).
- Apply bead of silicone as described above and in the video below forming a ridge with your fingers evenly along the crack (adding a plate of glass on the inside side of the crack will greatly increase strength). Flip the aquarium and repeat on the other side.
- Allow at least 24 hours to dry, allow 48 hours is better.
- This repair is ONLY recommended for aquariums under 10 gallons with single cracks, generally on the bottom.
For MAJOR cracks (only single cracks, not “spider” cracks)
For larger aquariums with single cracks I recommend adding a plate of glass to the inside of the crack repair in step #2. This plate need only cover the crack plus an inch or two, not the full bottom or side (although that would certainly be better yet).
I generally do not recommend this repair for tanks over 100 gallons, although I have cut glass panels to fit over the entire bottom without replacing the old cracked panel for larger aquariums or multi cracked smaller aquariums.
Otherwise I STRONGLY recommend replacing the glass panel.
Here is a YouTube Video we made for aquarium crack and hinge repair using a DAP Silicone utilizing Dow Patent Rights (Please note that most DAP Silicone is NOT certified Aquarium Safe!).
This video also shows how to correctly apply silicone and cut glass:
Here is another YouTube Video link that does a good job demonstrating stripping and then applying new silicone in an aquarium repair.
Please note that I do NOT recommend the silicone sealant he is using as this is a generic silicone (of which I have used many similar types out of China packaged under different generic names); as this silicone will not cure at the correct rate leaving potential gaps that show up over time.
As well the long term durability is questionable and safety for use around aquatic life is questionable since it is NOT Agricultre Canada, USDA, FDA approved for use around human foods which for me makes me question the use around fish (consider a Dow, GE or AAP (American Aquarium Sealants) brand silicone for your important aquatic pets!.
YouTube Video; Glass Aquarium Silicone Reseal
FOR DIY AQUARIUMS (or simply what to look for in a new glass tank)
Aquarium Selection Forward:
I have purchased and even built many aquariums over my career (mostly for clients), this includes both glass and acrylic and while I often here that one is better than the other or one is more likely to leak, often what is stated does not mesh with the reality based on the literally over 5000 aquariums I have serviced, fixed, sold, built, etc over the last 35 years.
The facts are a well built glass aquarium is AS GOOD as a well built acrylic when built to correct specifications and limits of the material used.
In fact I have been witness to more catastrophic acrylic tank failures than glass aquarium failures as a percentage of the number kept!!
Often with glass tanks, the problem is incorrect construction, poor quality silicone, or of late the use of tempered glass instead of float glass (which is much more pliable as noted a little later in this article).
A good example is many 55 & 60 gallon aquariums are built with 1/4" glass all around when these should be built with a 3/8" glass bottom then 1/4" in the sides. The result is premature leaks or bottom cracks.
With acrylic aquariums, the problem is often incorrect application of the cement that literally melts panels together, which the end result is a panel catastrophically totally failing with the tank emptying in a matter of minutes.
The bottom line is to select what works best for you, keeping in mind if the weight is an issue (if only for carrying the tank into place), the acrylic tank may be for you. As well for tanks much over 200 gallons or 8 feet in length, this is also where a WELL MADE acrylic tank should be purchased.
However, especially under 75 gallons, do NOT feel you are getting an inferior tank if you purchase a glass tank unless you purchase one with too thin of glass, with poor quality silicone or with tempered glass (in particular on the the bottom, which should always be float glass).
Recommended Glass thicknesses:
(Length x Height x Width)
| Aquarium Dimensions | Recommended Glass Thickness |
| 2 x 1 x 1 | 5mm glass |
| 2 x 1 x 1.5 | 6 mm (1/4") glass |
| 2 x 1.5 x 1.5 | 8 mm glass |
| 2.5 x 2 x 2 | 10 mm glass |
| 3 x1 x 1 | 6 mm glass |
| 3 x 1.5 x 1.5 | 8mm glass |
| 3 x 2 x 2 | 12 mm glass |
| 4 x 1.5 x 1.5 | 10mm (3/8") glass |
| 4 x 2 x 2 | 12 mm (1/2") glass |
| 6 x any size x 2 feet max. | 12 mm glass |
Please note that the formula for gallon calculations is L x H x W divided by 231 = Gallons. Multiply this by 3.785 for liters.
I do NOT recommend a glass aquarium over 250 -300 gallons!
Trim
• Please keep in mind that when either building or purchasing a glass aquarium, the thickness of the glass, which should be float glass (*NOT tempered glass), along with the type of silicone used, and finally construction methods are what will basically determine the quality of the finished aquarium.
*Tempered glass is too brittle for most aquariums over 60 gallons and even in 60 gallon aquariums it still should NOT be used in the bottom.
Float glass on the other hand is much more flexible and gives into the natural bowing/flexing of an aquarium holding water (based on 35 years of aquarium repair as well as apprentice training at a leading premium aquarium builder)
Avoid previously mentioned quick drying silicones, even if 100%. Use the appropriate thickness of glass.
Finally use float glass as while tempered glass might seem like a good idea, it does not have the strength and shatters easily into small bits.
Thankfully if purchasing an aquarium, I do not know of any reputable aquarium manufacturer making aquariums out of tempered glass for tanks over 60 gallons and actually not too many under. One reason would be insurance for a tempered glass aquarium would be higher due to higher risk of breakage. I can make these statements since I worked for a top notch aquarium manufacturer many years back (Prestige Aquariums).
The trim (which is generally plastic) offers LITTLE support other than providing a “cushion” between the bottom glass and stand and as well a “convenient” way to place the lid, lights, etc., on top.
Of coarse the trim does certainly add to the attractiveness, but as someone that has worked with high end aquarium manufacturers and built/repaired many myself, I can tell the reader here from an experience that the trim offers little in support and if it is necessary for support, you have a dangerously poorly built aquarium!
As well, I have removed trim from many tanks (including large ones) and filled them with water with no difference other than the unattractive aspect.
For calculating the amount of silicone needed for a job, I would recommend this link:
I would recommend a bead slightly wider than the width of the glass.
As an example, a 60 gallon aquarium with 1/4 inch wide glass would require a 3/16" bead of silicone. One tube of standard caulking tube of silicone would produce 43.378 feet of silicone at this width. So one 60 gallon would require about 24 feet for the initial seal of a complete build or rebuild of of a 60 gallon and another 14 feet for a double inside seam seal, so this would be 38 feet or slightly less than one tube.

SUMMARY:
Can you easily purchase the proper silicone at a Home Improvement Store?
The answer is yes, just do not purchase anything other than 100% Pure Silicone (color does not matter) and I strongly recommend brand loyalty as there are good reasons behind GE, AAP Sealants, and Dow Corning patents.
To be safe, if you are unsure of the silicone you are buying, do not try and save a few dollars at the local hardware or discount store when your local Pet Store or Aquarium Store as well as Premium online aquarium supply sellers may have the correct product for maybe a few dollars more (unless an exploding aquarium in the middle of the night is your idea of excitement).
More importantly, this popular resource (Aquarium/Pond Answers) is only FREE due to the sponsor who pays for the upkeep and research that goes into "Aquarium/Pond Answers". Purchasing via eBay, Amazon or others as is now very common will likely result in this free information going away some day
If you can not find quality Aquarium Sealant (either Dow Corning or American Aquarium Sealants; or one of their repackaged brands such as All Glass Aquarium; which hold patents for a good reason), please click on the picture to the left for an online source that supports and pays this web sites bills.
See link Below:
AAP Aquarium Silicone; at "American Aquarium Products" 100%, USDA Safe
Other Recommended Aquarium Information & Product Resources:
THE ONLY TWO AQUARIUM INDUSTRY AUTHORIZED SELLERS OF THIS PREMIUM ASI/AAP SILICONE:
AUTHORIZED SELLER; Premium AAP Aquarium Silicone

LED Aquarium Lights, Lighting
A unique web site with great insights into what determines the best in aquarium LED light fixtures
The most effective medication BAR NONE for the treatment of Columnaris in an aquarium when used as part of the four step program of Columnaris treatment.
A more synergistic combination than purchasing Kanamycin & Nitrofurazone separately.
AAP Spectrogram; Synergistic Kanamycin/Nitrofurazone
Sponge Filters
Patented Aquarium Sponge filters from the sponge filtration experts; AAP
UV Bulbs; Straight Tube, Compact; Replacement UV-C Lamps for your aquarium sterilizer, clarifier, or home/office purifier

Aquarium & Pond Plumbing Parts
Difficult to find or unique parts found nowhere else!
Including: T Water Diverters, Hose Barb Adapters, Couplings, & Reducers, Ball Valves, Swing Check Valves, Return Adapters, Intake Adapters
Aquarium Lighting
This is THE article for in-depth, researched, and regularly updated information on the subject of aquarium lighting; a MUST READ!
Filtration; Aquarium Filter Help, Troubleshooting, Reviews

"Clay Neighbor's AAP Premium All Natural" Premium Optimized Custom Fish Food Crumbles
Made in the USA & sold out of Oregon;
Superior to ALL other fish Foods in quality of optimization of ingredients!
ADVERTISEMENT
Labels: American Sealants, aquarium hinge, aquarium repair, Aquarium Silicone, broken aquarium, DIY Aquarium, glass aquarium, glass aquarium repair, tank repair
![]()


