
Our Facebook Page to Follow: Aquarium/Pond Answers Facebook
This is a unique resource for answers, help, & advice to aquarium and pond questions not found elsewhere; With regular posts & article updates.
In our research; we use aquaculture, horticulture, medical, & university research to compile many of our articles.Our Recommended Lighting for highest efficiency professional planted/reef aquariums: "AquaRay Lighting"
Aquarium Silicone, Tank Repair, Applications, DIY, How To Use
By Carl Strohmeyer-PAMR 40+ years experience
Updated 7/21/23
What Silicone to use and what not to use, Aquarium Repair (& leak identification), Aquarium construction.
Index;
- Silicone Basics
- Aquarium Applications
- Aquarium Repair
Including;
- For DIY (or NEW) Aquarium Selection (including forward comparing glass to acrylic); Glass Thickness & Type
- Silicone Needed Calculation
- Summary
*Also how to use silicone to repair an aquarium (three different applications)
*DIY Aquarium Glass Thickness recommendations.
*YouTube Video demonstrating application of silicone for aquarium crack and hinge repair
OVERVIEW:
This is a subject I have had a great deal of experience in. Due in part because one of my aquarium maintenance services was aquarium re-building, and I re-built many over my 30 years professionally employed in the aquarium maintenance business.
More importantly, I give credit to Bill of "Prestige Aquariums" (which unfortunately went out of business after his death). Bill took me under his wing in 1979 and provided me with free tutelage in the art of aquarium building and I learned a lot from him as a part time apprentice aquarium builder for a couple years.
Much of my experience as well as newer research is relayed in this article.
SILICONE BASICS:
Silicone rubber is a unique synthetic elastomer made from a cross-linked polymer which is reinforced with silica.
Its characteristics are such that it provides a balance of mechanical and chemical properties useful for bonding glass aquariums (not acrylic).
The basic formula is: Me3SiO(SiMe2O)nSiMe3
100% RTV Silicones (RTV= "Room Temperature Vulcanising") are the silicones commonly used for glass construction and is often sold in Home Improvement and Pet Stores (or Online).
Premium Silicone Resource that supports this FREE information page:
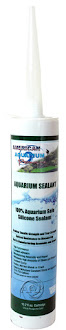
American Aquarium Products (AAP); 100% USDA Approved Silicone
PLEASE NOTE: AAP is the original and official seller of this product. Beware of clearance product sold via Amazon at a lower price, you likely will find a product that does not cure at the proper rate. We purchase directly from the manufacture, and even then the markup is only a $1.50 per container, so if someone is selling for less including shipping, you are indeed purchasing old clearance product, not to mention, harming the professional aquarium industry.
Reference: Buying Aquarium Products via Amazon (& Chewy, eBay)
RTV Silicones consist of polydialkylsiloxane with terminal hydroxyl groups (groups made up of an oxygen atom and a hydrogen atom connected by a covalent bond), which are reacted with organosilicon (chemical compounds containing carbon silicon bonds) cross-linking agents.
This operation is carried out in a moisture-free environment and results in the formation of a tetrafunctional structure (A chemical structure that possesses four highly reactive sites).
100% RTV Silicone Rubber Sealant produces a flexible, durable weather resistant seal between similar and dissimilar materials; 100% RTV Silicone provides excellent adhesion to tile, glass, porcelain, ceramic, fiberglass, non-oily woods, plaster, painted surfaces, and metal.
It will withstand temperature extremes from -60°F. to +450°F. and is waterproof for freshwater or saltwater use.
HOWEVER, beware of silicones that advertise "Weather Proof", as even if these claim to be 100% silicone, these have additives you do not want in your aquarium to better resist UV rays (which is NOT a concern in our aquariums).
Curing takes place when materials are exposed to moisture. Atmospheric moisture is sufficient to trigger the reaction, and thickness should be limited if only one side is exposed to the moisture source. Curing is also relatively slow, reliant on moisture ingress into the polymer which produces Acetic Acid vapors.
However some Silicone formulas will scavenge moisture quicker than other, thus curing in less time.
The result of generic silicones (even if 100%) is a less durable repair/build that does not last as long and does NOT hold up to jostling. Proof of this is during a 1987 earthquake in the LA area, several of the aquariums built with a quicker curing hardware store 100% silicone began leaking (NONE of those built with silicones specifically designed aquarium use had an issue).
Thus using a silicone DESIGNED FOR AQUARIUM USE (which includes being a higher modulus silicone) and working with silicone IN LOWER HUMIDITY is almost always more desirable.
As noted, different formulas and (combined with temperature and outside humidity) will affect cure time.
Dow Corning, AAP, and GE have proprietary formulas (although Dow is often packaged under other brands such as All Glass & Aqueon Aquarium) that cure at an even slower rate as compared to some cheaper formulas often sold in hardware stores that are generally used in construction where this is not an important factor.
This however is important for aquariums to have an even and slow cure time as even some 100% silicones I have used such as such as CRL, would cure too quickly resulting in a less than desirable bond.
Also some NON-100% formulas such as GE Silicon II have a mildew inhibitor (which would be toxic to the fish).
It is noteworthy that plastic (which is made from oil) is not mentioned.
RTV silicone is not useful for bonding acrylic aquariums and the oils within acrylic will eventually cause peeling away (lack of adhesion).
The bottom line is do NOT use silicone for repair of Acrylic/Plexiglass aquariums (or other acrylic applications)!
 For Plexiglass/Acrylic aquariums you would need to use Plexiglass or PVC Cement (Glue) which works by “melting” the Plexiglass panels together.
This is best applied with a needle applicator between the Plexiglass panels along with applying pressure. Silicone is often used after initial Plexiglass construction to provide more water tight seal along the seams of a Plexiglass/Acrylic aquarium, but this will peel after time (it can be re-applied) and provides NO strength for the actual plexiglass panels.
Silicone can also be used to form a seal where water pressure will push the glass panel against a surface that it would otherwise would not adhere well to (although once pressure is removed after initial filling, the silicone will likely not “seat” again in such an application where silicone does not properly bond).
ADVERTISEMENT
AQUARIUM APPLICATIONS:
100% "food grade" RTV Silicones are useful in the construction of glass aquariums and sealing the joints in DIY wooden aquariums. As noted earlier, Silicone is NOT useful for acrylic aquariums as it will peel away over time due to the inherent oils in plastics.
Why is this important?
As I noted in the Basics Section, too fast a cure will not allow proper surface adhesion especially in important seams.
It is also hard to work with in building aquariums and the person needs to work very quickly (usually too quickly) for proper aquarium construction.
Not all silicone formulas are the same, as stated earlier, Dow Corning, AAP, and GE produce a RTV silicone that cures at an even and slow rate necessary for aquariums. It is also noteworthy that most silicones labeled as 100% RTV, are still not food grade.
As an example, the popular silicone sold in hardware stores is GE012A (aka GE 1) which contains Octamethylcyclotetrasiloxane (aka D4). GE 1 or GE012A has D4 at 1-5% by weight.
Ever have one tank that nothing survives in? It probably had that 5% or worse of D4 (Octamethylcyclotetrasiloxane).
AAP/ASI Silicone has D4 @ .2% or less by weight.
Studies on D4 have shown extremely low quantities (we are talking µg / liter) can limit growth, reproduction, and decrease health in fish and it isn't good for us either. It also bioaccumulates. Once these silicones cure the risk is lessened, but D4 DOES still leach into water and even fatty tissues.
These hardware store 100% silicone (as well as most eBay and Amazon silicones if not authorized by AAP) contain D4 that is bad for your fish at low doses, although not immediately fatal at the levels leached into your aquarium. Just like you can drink water with high levels of lead or even arsenic for years and have no trouble, but eventually.
Yes there are many studies that show D4 leaches from silicone. None that we know of that involve aquariums though. Most studies are medical devices, implants, IV tubing, baby bottle nipples, water storage, etc. Guess aquariums aren't that much of a priority for toxicologists? But then you gotta follow the money.
Why gamble with cheap or clearance silicone to save a few dollars when your source should ONLY be AAP authorized aquarium silicone??

Also you want to purchase pure 100% RTV Silicone as many (including silicones produced by Dow Corning) have other ingredients for different applications such as fiberglass.
A good example of a silicone you do NOT want to purchase is Dow Corning Marine Sealant which I have actually seen recommended for aquariums in Yahoo Answers and other Internet sources!
This product is great for fiberglass hulls of boats however it lacks the proper strength for aquariums due to added ingredients that allow for adhesion to plastic.
As well any silicone that advertises that it can be painted on after curing has added ingredients and is not 100% silicone and NOT safe for aquariums or food use. Many silicones sold as hardware stores such as Home Depot have additives that are NOT aquarium safe, so BEWARE if you think about purchasing your silicone from such a retailer!

Finally, many silicones available for sale, especially generic brands often sold at big box home improvement store may be 100% RTV Silicone sealants, but these are not Agricultre Canada, USDA, & FDA approved.
This means these cannot be legally used for sealing any container, equipment, etc used for human food production or storage.
While this may not mean too much to some fish keepers, for me it is important to know that the silicone I am using on my expensive aquatic specimens meet such specifications, since I would not want to place my pet fish in an environment tainted by chemical residuals of a less than pure hardware store brand silicone or silicones often sold via eBay or Amazon (sometimes clearance product of the same manufacturer sold by AAP, but much lower quality due to old manufacture date which is why you should always seek AAP authroized sellers).
YET UNFORTUNATELY many aquarium keepers do just this to save a dollar or two, if that, over the FEW aquarium silicones such as AAP Aquarium Silicone approved for use where food is manufactured!!
This poor logic is baffling to me, as your fish are 100% immersed in the water that is constant contact with the silicone. Even foods processed in containers that have silicone seals only have a short time of exposure, unlike your fish. So to purchase one of these silicones at Home Depot, Lowes, or online on Amazon, eBay (although Authorized AAP Silicone is sold via eBay), etc, is fool hardy.If the USDA, FDA state that short term exposure for foods in contact with these unapproved silicones is not safe, what does this say about long term exposure by your fish??
Here is an inexpensive Food Safe Higher Modulus Silicone Resource that also is a large contributor to FREE aquarium information web sites such as this one:
USDA Aquarium Silicones; AAP
Silicone Life Expectancy;
Most Silicones last as to the stated lifetime from the manufacturer from my experience in keeping literally 1000s of glass aquariums, however being under water, and the acids, etc., do take their toll on the silicone.
However in an aquarium has been used, then left dry, I have found that the silicone will often leak when water is then added again. This is not a problem with a stored new/unused aquarium unless stored in sunlight.
In the case of a stored aquarium with dried or cracking silicone, it is best advised to remove the old silicone and re-apply, do NOT apply new silicone over old silicone.
AQUARIUM REPAIR;
With a good silicone, you can perform a few repairs yourself.
The picture/diagram to the below shows what to basically to look for as to silicone coverage in the important joint where two glass panels meet. This is where most of the strength is obtained from the silicone (please click on the pic to enlarge).
If the silicone is missing or pulled away (as can be easily observed by looking through the glass at each joint to see if air or water is present in place of silicone), you may need to repair this.

The addition of silicone in the inside corners gives added strength and small leak protection, but is not as important for aquarium strength as the silicone in the joint.
If any of the exposed silicone appears/feels dry and easily pulls or flakes away, it should be replaced.
This is also important that braces (if your aquarium has a brace), have this silicone as well.
Small Leak Identification:Often small leaks are the most difficult to find (identify the source of the leak so as to repair).
I have been called out by a client who thought that their tank had a leak on the bottom (which would require a strip down of the tank and stripping of silicone and reapplication), only to find that the aquarium actually was only seeping water from the top (often under the trim) and this small bead of water would run down the side seem in a manner that went unseen.
This type of leak can be found more easily by gently running a paper towel along the sides to look for trace amounts of water which the paper towel would quickly find.
If this is your leak, this could be from the trim (which is often a plastic material and does not adhere to the silicone as well and can often be repaired by simply lowering your water a few inches and stripping the silicone around the trim and then replacing this silicone.
Sometimes simply adding silicone in gaps in the trim or even lowering water level or reducing condensation of water on the glass top which may find its way around top gaps in the aquarium and then to the bottom of the aquarium (often resulting in a wet stand or similar condition)

- Empty aquarium
- Remove ALL old silicone with a razor blade (I prefer a single edge razor blade, see picture to the left).
For removing trim or cutting plastic back strips, I usually use a utility knife, always with a fresh blade (see picture below). - Clean and prepare surface with fine sandpaper (some like to use alcohol, but I have not found this helpful and my mentor at Prestige Aquariums whom I apprenticed under did not use alcohol).
- Make sure all surfaces are dry.
- Apply silicone (a caulking gun works best), making .5 (or smaller) cm. bead in the inside edges.
- Tighten all outside corners with strong reinforced duct tape. For tanks over 75 gallons I recommend wooden clamps.
- Immediately use your index finger to smooth ALL inside edge beads into a smooth surface, quickly wiping away excess silicone.
- Your repair is complete in 48 hours.
Please note that the Vinegar like fumes produced while curing are not generally toxic (I've worked in aquarium factories where the fumes are considerable and have never witnessed any problems), but good ventilation is suggested.

Utility Knife for cutting out silicone under plastic trim, removal of trim and cutting plastic back strips
TIP:
For clean up, both before applying new silicone and more for clean up of silicone that was misapplied but not "set", rubbing alcohol can be used.
Set silicone rubber will not dissolve in alcohol, however remnants left behind from scraping are often more readily removed by rubbing alcohol.
Set silicone will swell to some degree depending on the type of silicone and degree of cross-linking of the polymer. When this happens, the silicone polymer is essentially trying to dissolve, and taking solvent into its structural lattice. But when the alcohol is removed and allowed to evaporate, it will return to the original state, it had not dissolved, or melted.
For non structural corner chips:
- Drain aquarium down to the area of the chip.
- Inspect/ clean/ repair the inside area in needed.
- Clean out broken glass on the outside chip area
- Carefully clean out broken glass (gloves are recommended), a razor blade followed by fine sand paper works best.
- Inject new silicone followed immediately by a piece of glass that fits reasonably well into this chip.
- Add more silicone if necessary.
- Smooth repair and add a piece of wax paper (or similar waxy or mildly oily band aid), followed immediately by strong reinforced duct tape to hold this repair in place.
- This “band aid” can be removed in 24 to 48 hours and the aquarium re filled.
- Remove old hinge
- Place both pieces of glass on a firm level surface
- Run a .5 cm bead of silicone carefully down the area where both pieces of glass come together.
- Immediately, using your index and middle finger, run these fingers over the top of this silicone bead forming sharp peak of silicone between both pieces of glass. Remove excess. Bare hands (index and fore fingers) work best as the oils present repel the silicone from adhering too much to your fingers.
The silicone should look sort of like this after running along it with your index and fore finger pressed together: /\ (YouTube video located below demonstrates this) - After 24 to 48 hours your new and more durable hinge is ready.
For loose or failed (loose) Center Brace:
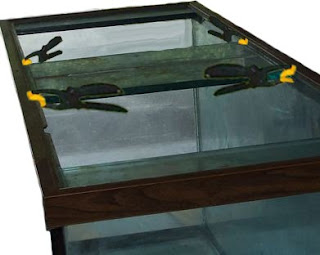
- Drain water down to whatever level it takes to move the brace back to its original fit (in other words to take out the "bow" in the glass)
- Remove ALL old Silicone
- If your aquarium has a plastic center brace, please note as stated elsewhere in this article that silicone does not adhere to oil based products well and eventually fails, so repair of this is doomed to eventual failure again.
My suggestion is to either cut or have cut (at a local glass shop) a glass center brace to replace the original plastic brace.
OR as noted by a member at Everything Aquatic, the use of an aluminum bar and drilled holes thru the bar and the original brace, then put rivets into the holes drilled. - Place an even bead of quality silicone on just the tank portion of where the brace needs to be placed back into.
- Finally clamp the brace as shown in the picture.
- Clean the area on BOTH side of the crack thoroughly with a razor blade (no solvents).
- Apply bead of silicone as described above and in the video below forming a ridge with your fingers evenly along the crack (adding a plate of glass on the inside side of the crack will greatly increase strength). Flip the aquarium and repeat on the other side.
- Allow at least 24 hours to dry, allow 48 hours is better.
- This repair is ONLY recommended for aquariums under 10 gallons with single cracks, generally on the bottom.
For MAJOR cracks (only single cracks, not “spider” cracks)
For larger aquariums with single cracks I recommend adding a plate of glass to the inside of the crack repair in step #2. This plate need only cover the crack plus an inch or two, not the full bottom or side (although that would certainly be better yet).
I generally do not recommend this repair for tanks over 100 gallons, although I have cut glass panels to fit over the entire bottom without replacing the old cracked panel for larger aquariums or multi cracked smaller aquariums.
Otherwise I STRONGLY recommend replacing the glass panel.
Here is a YouTube Video we made for aquarium crack and hinge repair using a DAP Silicone utilizing Dow Patent Rights (Please note that most DAP Silicone is NOT certified Aquarium Safe!).
This video also shows how to correctly apply silicone and cut glass:
Here is another YouTube Video link that does a good job demonstrating stripping and then applying new silicone in an aquarium repair.
Please note that I do NOT recommend the silicone sealant he is using as this is a generic silicone (of which I have used many similar types out of China packaged under different generic names); as this silicone will not cure at the correct rate leaving potential gaps that show up over time.
As well the long term durability is questionable and safety for use around aquatic life is questionable since it is NOT Agricultre Canada, USDA, FDA approved for use around human foods which for me makes me question the use around fish (consider a Dow, GE or AAP (American Aquarium Sealants) brand silicone for your important aquatic pets!.
YouTube Video; Glass Aquarium Silicone Reseal
FOR DIY AQUARIUMS (or simply what to look for in a new glass tank)
Aquarium Selection Forward:
I have purchased and even built many aquariums over my career (mostly for clients), this includes both glass and acrylic and while I often here that one is better than the other or one is more likely to leak, often what is stated does not mesh with the reality based on the literally over 5000 aquariums I have serviced, fixed, sold, built, etc over the last 35 years.
The facts are a well built glass aquarium is AS GOOD as a well built acrylic when built to correct specifications and limits of the material used.
In fact I have been witness to more catastrophic acrylic tank failures than glass aquarium failures as a percentage of the number kept!!
Often with glass tanks, the problem is incorrect construction, poor quality silicone, or of late the use of tempered glass instead of float glass (which is much more pliable as noted a little later in this article).
A good example is many 55 & 60 gallon aquariums are built with 1/4" glass all around when these should be built with a 3/8" glass bottom then 1/4" in the sides. The result is premature leaks or bottom cracks.
With acrylic aquariums, the problem is often incorrect application of the cement that literally melts panels together, which the end result is a panel catastrophically totally failing with the tank emptying in a matter of minutes.
The bottom line is to select what works best for you, keeping in mind if the weight is an issue (if only for carrying the tank into place), the acrylic tank may be for you. As well for tanks much over 200 gallons or 8 feet in length, this is also where a WELL MADE acrylic tank should be purchased.
However, especially under 75 gallons, do NOT feel you are getting an inferior tank if you purchase a glass tank unless you purchase one with too thin of glass, with poor quality silicone or with tempered glass (in particular on the the bottom, which should always be float glass).
Recommended Glass thicknesses:
(Length x Height x Width)
| Aquarium Dimensions | Recommended Glass Thickness |
| 2 x 1 x 1 | 5mm glass |
| 2 x 1 x 1.5 | 6 mm (1/4") glass |
| 2 x 1.5 x 1.5 | 8 mm glass |
| 2.5 x 2 x 2 | 10 mm glass |
| 3 x1 x 1 | 6 mm glass |
| 3 x 1.5 x 1.5 | 8mm glass |
| 3 x 2 x 2 | 12 mm glass |
| 4 x 1.5 x 1.5 | 10mm (3/8") glass |
| 4 x 2 x 2 | 12 mm (1/2") glass |
| 6 x any size x 2 feet max. | 12 mm glass |
Please note that the formula for gallon calculations is L x H x W divided by 231 = Gallons. Multiply this by 3.785 for liters.
I do NOT recommend a glass aquarium over 250 -300 gallons!
Trim
• Please keep in mind that when either building or purchasing a glass aquarium, the thickness of the glass, which should be float glass (*NOT tempered glass), along with the type of silicone used, and finally construction methods are what will basically determine the quality of the finished aquarium.
*Tempered glass is too brittle for most aquariums over 60 gallons and even in 60 gallon aquariums it still should NOT be used in the bottom.
Float glass on the other hand is much more flexible and gives into the natural bowing/flexing of an aquarium holding water (based on 35 years of aquarium repair as well as apprentice training at a leading premium aquarium builder)
Avoid previously mentioned quick drying silicones, even if 100%. Use the appropriate thickness of glass.
Finally use float glass as while tempered glass might seem like a good idea, it does not have the strength and shatters easily into small bits.
Thankfully if purchasing an aquarium, I do not know of any reputable aquarium manufacturer making aquariums out of tempered glass for tanks over 60 gallons and actually not too many under. One reason would be insurance for a tempered glass aquarium would be higher due to higher risk of breakage. I can make these statements since I worked for a top notch aquarium manufacturer many years back (Prestige Aquariums).
The trim (which is generally plastic) offers LITTLE support other than providing a “cushion” between the bottom glass and stand and as well a “convenient” way to place the lid, lights, etc., on top.
Of coarse the trim does certainly add to the attractiveness, but as someone that has worked with high end aquarium manufacturers and built/repaired many myself, I can tell the reader here from an experience that the trim offers little in support and if it is necessary for support, you have a dangerously poorly built aquarium!
As well, I have removed trim from many tanks (including large ones) and filled them with water with no difference other than the unattractive aspect.
For calculating the amount of silicone needed for a job, I would recommend this link:
I would recommend a bead slightly wider than the width of the glass.
As an example, a 60 gallon aquarium with 1/4 inch wide glass would require a 3/16" bead of silicone. One tube of standard caulking tube of silicone would produce 43.378 feet of silicone at this width. So one 60 gallon would require about 24 feet for the initial seal of a complete build or rebuild of of a 60 gallon and another 14 feet for a double inside seam seal, so this would be 38 feet or slightly less than one tube.

SUMMARY:
Can you easily purchase the proper silicone at a Home Improvement Store?
The answer is yes, just do not purchase anything other than 100% Pure Silicone (color does not matter) and I strongly recommend brand loyalty as there are good reasons behind GE, AAP Sealants, and Dow Corning patents.
To be safe, if you are unsure of the silicone you are buying, do not try and save a few dollars at the local hardware or discount store when your local Pet Store or Aquarium Store as well as Premium online aquarium supply sellers may have the correct product for maybe a few dollars more (unless an exploding aquarium in the middle of the night is your idea of excitement).
More importantly, this popular resource (Aquarium/Pond Answers) is only FREE due to the sponsor who pays for the upkeep and research that goes into "Aquarium/Pond Answers". Purchasing via eBay, Amazon or others as is now very common will likely result in this free information going away some day
If you can not find quality Aquarium Sealant (either Dow Corning or American Aquarium Sealants; or one of their repackaged brands such as All Glass Aquarium; which hold patents for a good reason), please click on the picture to the left for an online source that supports and pays this web sites bills.
See link Below:
AAP Aquarium Silicone; at "American Aquarium Products" 100%, USDA Safe
Other Recommended Aquarium Information & Product Resources:
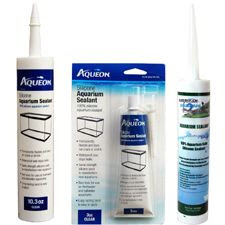
THE ONLY TWO AQUARIUM INDUSTRY AUTHORIZED SELLERS OF THIS PREMIUM ASI/AAP SILICONE:
AUTHORIZED SELLER; Premium AAP Aquarium Silicone

LED Aquarium Lights, Lighting
A unique web site with great insights into what determines the best in aquarium LED light fixtures
The most effective medication BAR NONE for the treatment of Columnaris in an aquarium when used as part of the four step program of Columnaris treatment.
A more synergistic combination than purchasing Kanamycin & Nitrofurazone separately.
AAP Spectrogram; Synergistic Kanamycin/Nitrofurazone
Sponge Filters
Patented Aquarium Sponge filters from the sponge filtration experts; AAP
UV Bulbs; Straight Tube, Compact; Replacement UV-C Lamps for your aquarium sterilizer, clarifier, or home/office purifier

Aquarium & Pond Plumbing Parts
Difficult to find or unique parts found nowhere else!
Including: T Water Diverters, Hose Barb Adapters, Couplings, & Reducers, Ball Valves, Swing Check Valves, Return Adapters, Intake Adapters

Aquarium Lighting
This is THE article for in-depth, researched, and regularly updated information on the subject of aquarium lighting; a MUST READ!
Filtration; Aquarium Filter Help, Troubleshooting, Reviews

"Clay Neighbor's AAP Premium All Natural" Premium Optimized Custom Fish Food Crumbles
Made in the USA & sold out of Oregon;
Superior to ALL other fish Foods in quality of optimization of ingredients!
ADVERTISEMENT
Labels: American Sealants, aquarium hinge, aquarium repair, Aquarium Silicone, broken aquarium, DIY Aquarium, glass aquarium, glass aquarium repair, tank repair
<< Home


